Looking for some footwork drills for west coast swing? Want to look smoother on the floor? Need to learn to stop looking like a beginner? Want to add some styling to your footwork? In this article we will cover 5 footwork drills to improve your west coast swing
>
1. Roll through your feet
If you compare a new dancer to an experienced dancer, one of the first visual differences you will see is that the new dancer looks like he or she is marching, while the experienced dancer can glide across the floor. Marching is common among newer dancers because they are still learning where their feet go, and being overly deliberate makes their steps look staccato.
But if you’ve been dancing for a while, know your basic footwork, and have started to learn how to roll through your feet, you might still find that your dance looks “marchy” on occasion. Today’s drill will help fix those troublesome spots.
TAKE ACTION> Download this drill on video
The Drill:
On your own, stand with your feet together and your weight entirely on one foot. You are going to roll the free foot off the floor by peeling the foot off the ground, heel first. Do this in two ways, and watch in a mirror (or on a videocamera) to see the difference.
- As you peel the foot off the floor, think about pulling up from the knee. If you watch this action, it will look like you are marching.
- For contrast, think about letting the knee articulate forward, rather than up, as you peel the foot off the floor. That looks much smoother, doesn’t it?
One of the common causes of the “marching” look is when the knees are lifted upwards. If the focus is on letting the knee move forward, rather than up, the motion looks much smoother.
Practice peeling your feet off the floor, heel first, and then rolling back down to the floor from the toe to the heel. As you practice this action, focus on letting your knees articulate forward rather than lifting the knees.
TAKE ACTION> Download this drill on video
2. Take smaller steps
Most dancers move too much. When dancers take steps that are too large, they can run out of room at the end of the slot; either the anchor, posture, or frame will suffer. They can also struggle dancing to faster music because there simply isn’t enough time to cover the distance.
Learning to dance small is not easy.
This exercise is designed to practice dancing with smaller steps. It will be challenging, especially if you aren’t very conscious of your step size or if you are just learning to control your center.
Once you learn this skill, you’ll find that you have much better control not just through your small steps, but also when you intentionally decide to move further for styling.
The Drill:
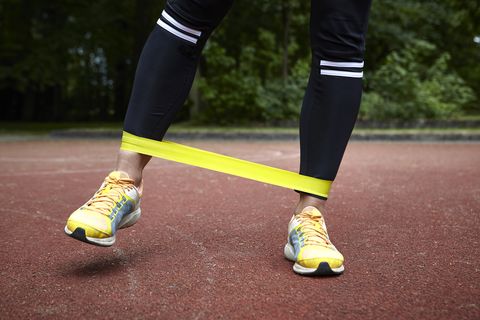
For this drill, use a short length of rope, a Thera band, or a bungee cord.
Make a loop about the width of your hips and put the rope around your ankles. Be careful so you don’t trip yourself during the next phase of this exercise—start slowly so you can get used to your limited mobility.

Dance your basics and be aware of the size of your steps. The loop will limit your step size, forcing you to be keep your movements small. As you dance, focus on maintaining your body flight throughout the movement. You will need to control your weight transfer through every part of your foot.
Learn Applejacks
Applejacks are footwork variations that look very busy and groovy at the same time. This drill will help you learn to do applejacks.
The Drill:
Stand with your feet about hip width apart and your toes pointing forward. You don’t want to have your feet as wide as your shoulders, nor do you want your feet turned out. Put your weight on the heel of your left foot and the toe base of your right foot. Yes, you are split weight—this movement really does break all the normal rules for footwork. This is your starting position.
- With your left heel and right toe weighted, pivot your feet to send the left toe and right heel to the left.
- Leaving your weight where it is, reverse the pivot to bring your feet back to your starting position. When your feet hit center, switch your weight to your left toe base and your right heel.
- Now with your left heel and right toe base free, pivot both of these parts of your feet to the right.
- Finally, return your feet to the starting position and again switch your weight to the left heel and right toe base.
The video below shows the entire sequence:
Once you can perform this sequence smoothly, you can work on increasing your speed. In the wild, you will usually do that sequence in two beats: going from start to flaring to the left on the downbeat, recovering to center on the & count, flaring right on the upbeat, and recovering on the next & count.
4. Dance on a paper plate
One of the keys to tight-looking, clean, and fast footwork is keeping the footwork small. Dancing with your feet far apart makes it easy to end up in ugly split-weight positions, and it also makes it extremely difficult to perform the footwork at high tempos. A good guideline is to keep your feet underneath your hips at all times. This exercise is designed to help you keep your footwork contained underneath your body.
The Drill:
Place or tape a paper plate to the floor. (If you’re a guy with size 15 shoes, you can use tape together a couple of sheets of paper, or cutout an appropriately sized circle from a sheet of butcher paper.) Practice performing your with your feet always touching the paper plate. As you get more comfortable, slowly move more of your foot onto the plate until you always have the balls of your feet (or your power point) on the plate.
You can practice any non-moving footwork variation in this manner. This is a great technique for working on closed third position anchors, cross steps, and ball change rhythms.
5. Build ankle strength with calf raises
The smooth look of west coast swing is created by rolling through the feet. Controlling the roll requires a good amount of strength through the arch of the foot and the calf. Dancers without the strength to control this motion will fall through the foot and appear flat-footed even when they step with a ball-heel action.
This exercise is great for developing your calf and arch strength. As you practice, be aware of your body’s limits: it’s okay for the body to be sore, but never ignore pain. You will need to practice this exercise regularly in order to build up the stamina to control you’re looking for.
The Drill:
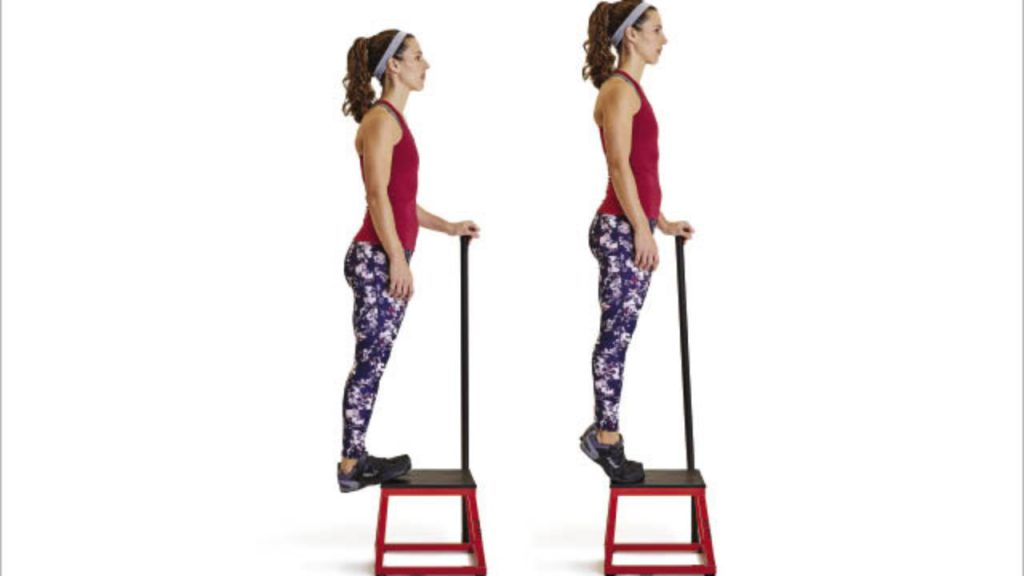
Stand on the edge of a stair, a box, or a piece of furniture that will support your weight. Your heels should hang over the edge so your weight is supported by the front half of the foot.
Slowly lower your heels until they are below the level of the edge of the stair (or whatever support you are using). Hold this position for a couple of seconds, and then lift your heels until you’re in a stable tiptoe position. Hold at the top for another couple of seconds, then repeat. Aim to do sets of 20 repetitions at first, increasing your rep count as your ankle strength develops.

The key is moving in a slow and controlled manner. It’s far more effective to do 10 reps that take several seconds each way and than to do 50 explosive reps. You’re trying to train your muscles to take time as you control the height of the heel. Take your time!
When you are beginning this drill, it is strongly recommended to hold onto a railing or other support so you don’t fall backwards. This is a drill that benefits from frequent repetition. It’s better to do 30 seconds every day than a marathon session on the weekend. Before you know it, you are building ankle strength and hopefully seeing a change in your footwork!
TAKE ACTION> Download our #1 Footwork Drill for WCS


 Brian & Megan