
If you’re looking to improve your basic footwork for west coast swing, or improve your styling, there are many things to consider. There are lots of styling options and approaches to basic footwork to make you look good on the floor. However, if we don’t cover a couple basics first… it will all be for naught. If you’re brand new to west coast swing, you’ll want to learn all the basic patterns first. If you’ve got those covered… lets jump in!
Footwork Styling Basics
I want to talk about 4 important footwork concepts.
- Turnout of your feet
- Rolling through your feet.
- Small steps
- Single Tracking
All good WCS dancers do these and you should too.
1. Turnout Your Feet
“Keep your feet turned out” is as close to an absolute rule as WCS has.
Yet remembering to keep your feet turned out during fancy footwork is hard.
How can you train your feet to stay turned out in any position?
This drill will focus on foot turnout through every position you put your feet in. By repeating this exercise, you will build the muscle memory to automatically turn out, no matter how strange the position you find yourself.
The Drill: For this drill, you’re going to freestyle dance. Start with your feet in first position, with between 30° and 45° of turnout. (In other words, your feet should form a maximum of half a right angle.)
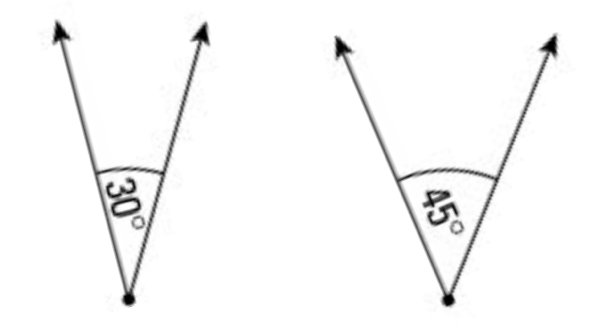
(Point your toes towards the arrows with your heels together somewhere between 30 & 40 degrees)
Now start moving your feet.
The only rule for this exercise is that the feet have to keep the same degree of turnout relative to each other. If your left foot rotates out, your right foot needs to turn the same amount in the same direction. The feet can be in any position—left in front, right hooked behind, right to the side, whatever. But, the angle of the feet should not change.
For this drill, being more turned out is as bad as being turned in, because your goal is to keep the angle between the feet exactly the same as when you started.
As you continue to move your feet, you will discover when you need to rotate your standing leg in order to keep the same degree of turnout. Keep moving until you rotate your standing leg instinctively.
By continuously pushing your feet to keep the same degree of turnout, you’ll become aware of the motions that tend to turn in, and you’ll also train your supporting leg to adjust in order to avoid turning in.
2. Rolling Through Your Feet
One of the earliest techniques that WCS dancers need to learn is rolling through the feet.
Good foot articulation not only makes your dancing look smoother and more controlled, but it also enables you to develop body flight throughout your movement.
Many dancers struggle with rolling through the feet because their steps are flat footed, and so there is not enough foot articulation to be able to roll through.
In this drill, we’re going to address that issue by thinking about peeling the feet off of the floor.
TAKE ACTION> Download our video “Rolling Through Your Feet”
By articulating the foot as it comes off the floor, you can ensure that your foot is in a good position to roll back onto the floor when you take your next step.
The Drill: Stand with your feet next to each other in a turned out first position, and put your weight entirely on one foot.
Slowly peel the unweighted foot off the floor.
As the knee of the unweighted leg bends, think of the heel coming off the ground, then the midsection of the foot, then the ball, and finally the toes.
Notice the position of the foot as it finally comes off the ground. Because your foot is pointed, the heel is further off the ground than the toes and ball of the foot. That gives you space to roll through the foot when you place that step.
Reverse the process to roll down through the foot: toe is in contact with the ground, then the ball, then the midsection and finally the heel.
Switch weight and repeat the process with the other foot.
As you are peeling each foot off the floor, pay attention to how the ankle helps articulate the foot.
You should feel the ankle acting to point the foot as you get closer to the toe and controlling the foot’s action as you bring the rear part of the foot back into contact with the floor.
This is a drill, so over exaggerate the motion in order to develop the peeling action.
When you are actually dancing WCS, you won’t have time to work all the way to a pointed foot (especially on your triples), but the process of peeling the foot off the floor in order to roll back onto the foot will help your footwork look more controlled and deliberate.
TAKE ACTION> Download our video “Rolling Through Your Feet”
3. Keep your steps small
Most dancers move too much.
When dancers take steps that are too large, they can run out of room at the end of the slot; either the anchor, posture, or frame will suffer.
They can also struggle dancing to faster music because there simply isn’t enough time to cover the distance.
Learning to dance small is not easy.
Because your steps are smaller, you have a smaller base to balance on as you transfer your weight.
You also have a smaller area to cover as you move your center, which means that you need to control a slower movement of your center in order to fill the space between beats.
Smaller steps also require more foot and ankle control in order to roll through the feet. In short, dancing with smaller steps requires a lot of body control.
This exercise is designed to practice dancing with smaller steps. It will be challenging, especially if you aren’t very conscious of your step size or if you are just learning to control your center.
Once you learn this skill, you’ll find that you have much better control not just through your small steps, but also when you intentionally decide to move further for styling.
The Drill: For this drill, use a short length of rope, a Thera band, or a bungee cord.
Make a loop about the width of your hips and put the rope around your ankles.
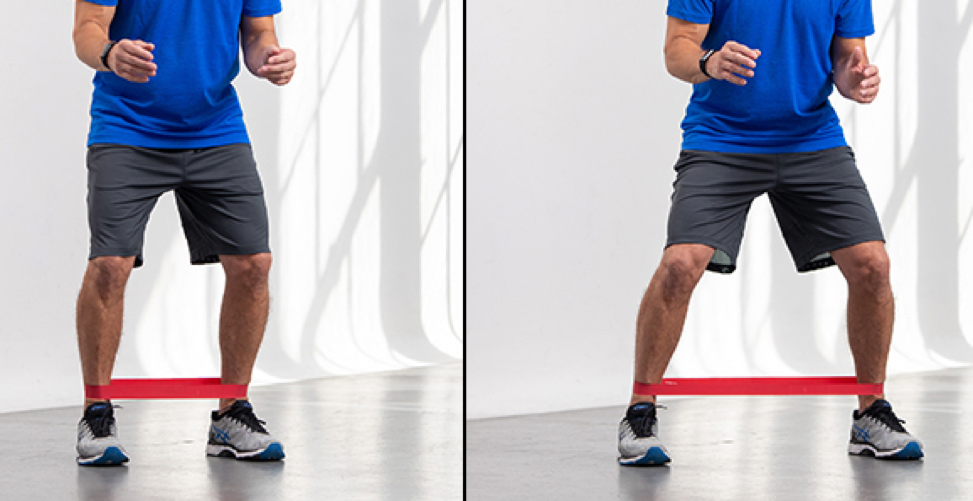
Be careful so you don’t trip yourself during the next phase of this exercise—start slowly so you can get used to your limited mobility.
Dance your basics and be aware of the size of your steps. The loop will limit your step size, forcing you to be keep your movements small.
As you dance, focus on maintaining your body flight throughout the movement. You will need to control your weight transfer through every part of your foot.
If you are struggling, pay attention to what part of your foot has your weight at every moment. Start with broad areas: the front of the foot, the heel, etc.
As you practice, work on feeling where your weight is more precisely: instead of the front of the foot, narrow it down to the ball, behind the ball, between the ball and toes, toes only, and so forth.
When you can feel smaller distinctions in where your weight is, then continue practicing until you can control your weight at that smaller scale
4. Single Tracking
Single tracking refers to the relative placement of the feet while progressing down the slot.
In general, the heels of the feet should remain in a straight line, as if you were walking on a balance beam.
This technique creates clean leg lines and allows for much better control of the center’s movement.
If both feet remain on separate tracks, the resulting movement will waddle between the two tracks—which is neither pretty nor efficient.
The Drill: Without a partner, practice walking forwards and backwards while keeping your heels on a straight line. The feet should brush past each other on every step.
For Leaders: Single tracking creates clean lines, but doing it constantly creates a feminine look. On the follower’s side of the dance, femininity looks elegant. On the leader’s side of the dance, it looks submissive and unconfident. As a result, leaders are allowed to cheat slightly when single tracking. It’s ok to have a slightly wider base between the feet on the leader side of the dance; the feet don’t have to literally brush past each other.
To be clear: double tracking looks like a sore cowboy rather than a confident leader, so don’t let your feet extend outside of your hips on normal steps. You are still single tracking—you just have a slightly wider track to work with.
Footwork & Styling (Intermediate & Beyond)
Again there are an unlimited amount of things to throw in this category but we will toss out a few ideas. Think of these as a chose your own adventure guide. Grab one that looks fun and add it to your dancing!
1. Keep Your Thighs Together
When pros move, their legs almost never get away from their body.
Especially when they are doing fast footwork, or when they are spinning, their feet remain beneath their hips.
Keeping the feet underneath the body makes it easier to transfer weight quickly, it keeps them from wobbling between steps, and it produces much better leg lines.
The easiest way to train steps that stay under the body is to focus on keeping your thighs together.
If your thighs remain in contact during a spin, you physically can’t end up in an ugly, wide-legged cowboy pose.
If you are stepping forward, your thighs may separate—but if you focus on making your thighs brush each other when the receiving leg passes the sending leg, you’ll avoid an unsightly gap between your legs and make it much more likely that your steps remain an appropriate size.
This exercise will focus on spins because it’s easy to let the legs separate while you’re thinking about your balance.
If you practice this exercise for spins, you’ll find that you naturally tend to keep your thighs together more throughout the rest of the dance.
The Drill: Find a space with enough distance to do a couple of chaines turns and a small towel. Your goal is simple: put the towel between your thighs, and do chaines turns without letting the towel drop.
You can keep your thighs together in two ways: you can press your legs into each other, or you can think of pulling your leg muscles up into the hip, which will in turn bring your thighs closer together.
You want to do more of the latter—pulling your leg muscles up will keep your legs in a nice line, while just pushing the thighs together can result in an ugly knee position if your feet remain wide.
If you’re doing it right, you should feel like your feet have to stay close together.
The speed of the turns is totally irrelevant, so go as slowly as you need in order to feel comfortable. The point of the drill is to learn how to keep your thighs in contact throughout the movement.
2. Using Your Sending Foot
Watch some videos of great dancers, and you’ll notice that the all seem to project through space. If you want to learn that same kind of intentional movement, you need to start using your sending foot.
In every movement of the body’s center, there is a sending foot and a receiving foot. One of your feet pushes off the ground and sends your center through space; the other foot receives your center and absorbs the body’s energy back into the ground.
Most dancers, however, don’t use their sending foot properly.
Instead of using the sending foot to project the center, most people reach with their receiving foot and pull themselves onto that leg.
When the center is pulled by the receiving leg, the center’s movement is less consistent, less fluid, and less controlled.
Without using the sending foot, it is almost impossible to create the smooth and controlled body flight that characterizes WCS.
This drill will start developing an awareness of your sending foot so that you can project your center through space, rather than dragging it along for the ride.
The Drill: Find some space to dance your basic footwork. As you dance, think about the sending foot rather than the receiving foot. This is probably the opposite of how you were taught to dance, so let’s explain what you should be thinking.
Leaders: instead of starting with your left foot, think of starting by pushing off your right foot. Then push off your left foot for count 2. On the triple, think of pushing off right-and-right (3&4), then for the anchor pushing off left-and-left (5&6).
Followers: think of pushing off your left foot to start your forward motion, instead of stepping with your right. Then on count 2, push off your right. For 3&4, think push left-and-left, and for the anchor think of pushing off right-and-right.
For both leaders and followers: you are doing the same footwork as normal. Leaders, your left foot is going back on 1; followers, your right goes forward. What has changed is which foot you are concentrating on. Instead of focusing on the foot that is moving, you are thinking about the foot that is not moving and thus can push off the ground.
Do this drill until pushing onto the next foot becomes comfortable. Once you can do that, you can start to work on what the receiving foot does in order to control the energy created by the sending foot. Stay tuned for that drill!
3. Work Through a Straight Leg
The general rule for west coast swing is that you should not have two bent knees unless you are deliberately creating a level change. Learning to work through a straight leg on every step will improve the quality of your lines.
In this exercise, we’re going to work through a straight leg on steps in place. For the purposes of this exercise, we’re not going to focus on the timing of the weight transfer; we’re just going to work on completing the leg action with each step.
The Drill: On your own, practice stepping in place. Roll through the receiving foot, and as your heel makes contact with the floor, continue straightening your receiving leg until the knee is straight. You don’t want to lock the knee or hyper-extend it; just get to a straight leg.
When the leg is straight, make sure that all your weight is on the receiving side. You don’t want to be split weight at all. Release the heel of the now-unweighted foot by letting that knee bend forward. You should feel your hip on the weighted side settle slightly.
Peel the unweighted foot off the floor, heel first, then roll that foot back down to the ground from toe to heel. This foot is now the receiving foot. As the heel makes contact with the ground, straighten the leg.
For the purposes of this exercise, the exact timing of when you transfer weight is not as important as the start and finish positions. There should be no weight on a foot when the heel releases from the floor.
When the free foot makes contact with the floor on the way down, there should still be no weight on it. At some point, the weight will transfer to that foot as the the foot rolls through to the floor.
When the knee is straight, the foot should be fully weighted and the other foot should have no weight so the heel can release.
As you practice this exercise, focus on working all the way to a straight leg before releasing the heel of the other foot. When you can straighten and release the leg fluidly, you can begin playing with the rate of weight transfer until you find how to switch your weight in a way that is comfortable for you.
4. Adding Energy to your Leg Lines
Most dancers who are not trained professionals end up in positions that don’t look intentional.
Great dancers are different. When they hit a position, every part of their body feels like it snaps into place. If you want to add that sense of purpose to your legs, this drill is for you!
The Drill: Get into a pose that has a leg line. For this drill, I’ll assume that you are tapping to the side in order to accent a minor hit, but you can extend this drill into anything that has a leg line: sinking into a lunge for a break, doing a ronde, or even flaring your leg out of a trick.
When you have your free foot out in a tap, think of sending energy through the free leg into the floor.
Your goal is to have some tone in the leg. To help you, have your partner try to push your free leg with their leg. While your partner is trying to move your leg, you should be engaging your thigh muscles and pressing into the floor in order to keep your leg from moving.
After you’ve held the position for 5-10 seconds, shake out your leg and try again. By training yourself to keep energy in your leg, you are making yourself feel and look more solid. This solidity gives definition and purpose to your leg lines.
If you’re not convinced, have your partner take pictures of you in this pose. In one photo, just put your leg in position. In the other, really think about maintaining the energy all the way from the hip to the floor. Look at the photos and see how much of a difference it makes when you are intentional about keeping the free leg in its position.


 Brian & Megan